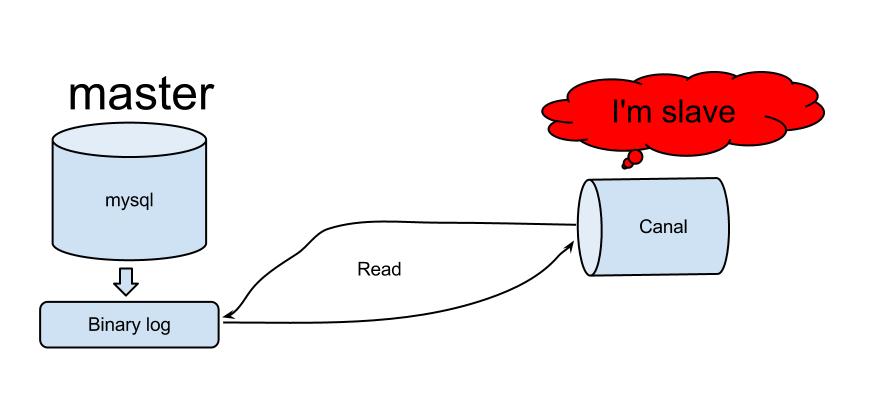
Canal 是用于解析数据库日志的工具,可用于 MySQL 同步数据到 ES。
介绍
Canal 伪装自己为 MySQL slave,MySQL master 把 binlog 推送到 slave,Canal 解析 binlog。

使用之前需注意:
- 要开启 MySQL binlog:
[mysqld] log-bin=mysql-bin #添加这一行就ok binlog-format=ROW #选择row模式 server_id=1 #配置mysql replaction需要定义,不能和canal的slaveId重复 - 要给 Canal 一个权限足够的 MySQL 用户:
CREATE USER canal IDENTIFIED BY 'canal';
GRANT SELECT, REPLICATION SLAVE, REPLICATION CLIENT ON *.* TO 'canal'@'%';
-- GRANT ALL PRIVILEGES ON *.* TO 'canal'@'%' ;
FLUSH PRIVILEGES;
当前版本的 Canal release 页面发布了 3 个组件:
- canal.adapter:用于同步数据。
- canal.deploy:部署 canal server。
- canal.example:client 的样例。
以上组件都是开箱即用的(但是经我试用,基本都不能直接使用需要自己从源代码编译)。
本文使用 1.1.2 版本,由于 Canal 源码有一些编译问题,进行了小小的修改,这个版本可以直接编译使用。这里要编译 deployer 和 client-adapter。
在项目中使用 Canal 时要有 server 和 client:
- server 用于监控 MySQL binlog,可直接用 canal.deploy 部署。
- client 用户数据解析,可参考 canal.example 开发;同步数据可以直接用 canal.adapter。
源码主要部分有:
- protocol:解析 MySQL 协议。
- server:server 端,监控 MySQL。
- client:client 端,可以自定义解析。
- adapter:同步数据用到的主要代码,可用于 ES(基于 SPI)。
使用
准备
准备和 Nifi 中相同的表结构和 ES index、mapping 结构。
server
server 的目录结构:

主要介绍 conf:
- canal.properties:canal 的配置信息,默认监控的 instance 是 example(重要部分有中文注释):
################################################# ######### common argument ############# ################################################# canal.id = 1 canal.ip = canal.port = 11111 canal.metrics.pull.port = 11112 # HA 模式下要设置 canal.zkServers = # flush data to zk canal.zookeeper.flush.period = 1000 canal.withoutNetty = false # tcp, kafka, RocketMQ canal.serverMode = tcp # flush meta cursor/parse position to file canal.file.data.dir = ${canal.conf.dir} canal.file.flush.period = 1000 ## memory store RingBuffer size, should be Math.pow(2,n) canal.instance.memory.buffer.size = 16384 ## memory store RingBuffer used memory unit size , default 1kb canal.instance.memory.buffer.memunit = 1024 ## meory store gets mode used MEMSIZE or ITEMSIZE canal.instance.memory.batch.mode = MEMSIZE canal.instance.memory.rawEntry = true ## detecing config canal.instance.detecting.enable = false #canal.instance.detecting.sql = insert into retl.xdual values(1,now()) on duplicate key update x=now() canal.instance.detecting.sql = select 1 canal.instance.detecting.interval.time = 3 canal.instance.detecting.retry.threshold = 3 canal.instance.detecting.heartbeatHaEnable = false # support maximum transaction size, more than the size of the transaction will be cut into multiple transactions delivery canal.instance.transaction.size = 1024 # mysql fallback connected to new master should fallback times canal.instance.fallbackIntervalInSeconds = 60 # network config canal.instance.network.receiveBufferSize = 16384 canal.instance.network.sendBufferSize = 16384 canal.instance.network.soTimeout = 30 # binlog filter config # 哪些 binlog 的语句要监控 canal.instance.filter.druid.ddl = true canal.instance.filter.query.dcl = false canal.instance.filter.query.dml = false canal.instance.filter.query.ddl = false canal.instance.filter.table.error = false canal.instance.filter.rows = false canal.instance.filter.transaction.entry = false # binlog format/image check canal.instance.binlog.format = ROW,STATEMENT,MIXED canal.instance.binlog.image = FULL,MINIMAL,NOBLOB # binlog ddl isolation canal.instance.get.ddl.isolation = false # parallel parser config canal.instance.parser.parallel = true ## concurrent thread number, default 60% available processors, suggest not to exceed Runtime.getRuntime().availableProcessors() #canal.instance.parser.parallelThreadSize = 16 ## disruptor ringbuffer size, must be power of 2 canal.instance.parser.parallelBufferSize = 256 # table meta tsdb info canal.instance.tsdb.enable = true canal.instance.tsdb.dir = ${canal.file.data.dir:../conf}/${canal.instance.destination:} canal.instance.tsdb.url = jdbc:h2:${canal.instance.tsdb.dir}/h2;CACHE_SIZE=1000;MODE=MYSQL; canal.instance.tsdb.dbUsername = canal canal.instance.tsdb.dbPassword = canal # dump snapshot interval, default 24 hour canal.instance.tsdb.snapshot.interval = 24 # purge snapshot expire , default 360 hour(15 days) canal.instance.tsdb.snapshot.expire = 360 # aliyun ak/sk , support rds/mq canal.aliyun.accesskey = canal.aliyun.secretkey = ################################################# ######### destinations ############# ################################################# # 监控的 instance canal.destinations = example # conf root dir canal.conf.dir = ../conf # auto scan instance dir add/remove and start/stop instance canal.auto.scan = true canal.auto.scan.interval = 5 canal.instance.tsdb.spring.xml = classpath:spring/tsdb/h2-tsdb.xml #canal.instance.tsdb.spring.xml = classpath:spring/tsdb/mysql-tsdb.xml canal.instance.global.mode = spring canal.instance.global.lazy = false #canal.instance.global.manager.address = 127.0.0.1:1099 #canal.instance.global.spring.xml = classpath:spring/memory-instance.xml canal.instance.global.spring.xml = classpath:spring/file-instance.xml #canal.instance.global.spring.xml = classpath:spring/default-instance.xml ################################################## ######### MQ ############# ################################################## canal.mq.servers = 127.0.0.1:6667 canal.mq.retries = 0 canal.mq.batchSize = 16384 canal.mq.maxRequestSize = 1048576 canal.mq.lingerMs = 1 canal.mq.bufferMemory = 33554432 canal.mq.canalBatchSize = 50 canal.mq.canalGetTimeout = 100 canal.mq.flatMessage = true canal.mq.compressionType = none canal.mq.acks = all - example:默认 instance 的配置,内部包括 instance.properties(重要部分有中文注释):
################################################# ## mysql serverId , v1.0.26+ will autoGen # mysql 的 slave id # canal.instance.mysql.slaveId=1234 # enable gtid use true/false canal.instance.gtidon=false # position info canal.instance.master.address=127.0.0.1:3306 canal.instance.master.journal.name= canal.instance.master.position= canal.instance.master.timestamp= canal.instance.master.gtid= # rds oss binlog canal.instance.rds.accesskey= canal.instance.rds.secretkey= canal.instance.rds.instanceId= # table meta tsdb info canal.instance.tsdb.enable=true #canal.instance.tsdb.url=jdbc:mysql://127.0.0.1:3306/canal_tsdb #canal.instance.tsdb.dbUsername=canal #canal.instance.tsdb.dbPassword=canal #canal.instance.standby.address = #canal.instance.standby.journal.name = #canal.instance.standby.position = #canal.instance.standby.timestamp = #canal.instance.standby.gtid= # username/password # 为 canal 建立的 mysql 用户名密码 canal.instance.dbUsername=canal canal.instance.dbPassword=canal canal.instance.connectionCharset=UTF-8 canal.instance.defaultDatabaseName=test # enable druid Decrypt database password canal.instance.enableDruid=false #canal.instance.pwdPublicKey=MFwwDQYJKoZIhvcNAQEBBQADSwAwSAJBALK4BUxdDltRRE5/zXpVEVPUgunvscYFtEip3pmLlhrWpacX7y7GCMo2/JM6LeHmiiNdH1FWgGCpUfircSwlWKUCAwEAAQ== # table regex canal.instance.filter.regex=.*\\..* # table black regex canal.instance.filter.black.regex= # mq config canal.mq.topic=example canal.mq.partition=0 # hash partition config #canal.mq.partitionsNum=3 #canal.mq.partitionHash=mytest.person:id,mytest.role:id ################################################# - metrics:监控信息。
- spring:server 的 spring 配置文件。
启动 server 用上面编译的 deployer,在 bin 目录下执行:
sh ./startup.sh
client
client 目录结构:

-
conf 目录下 application.yml 是 client 的配置文件(client 是一个 Spring Boot 2.0 的项目):
server: port: 8081 logging: level: org.springframework: DEBUG com.alibaba.otter.canal.client.adapter.hbase: DEBUG com.alibaba.otter.canal.client.adapter.es: DEBUG com.alibaba.otter.canal.client.adapter.rdb: DEBUG spring: jackson: date-format: yyyy-MM-dd HH:mm:ss time-zone: GMT+8 default-property-inclusion: non_null canal.conf: canalServerHost: 127.0.0.1:11111 # zookeeperHosts: slave1:2181 # mqServers: slave1:6667 #or rocketmq # flatMessage: true batchSize: 500 syncBatchSize: 1000 retries: 3 timeout: accessKey: secretKey: mode: tcp # kafka rocketMQ srcDataSources: defaultDS: url: jdbc:mysql://127.0.0.1:3306/test?useUnicode=true username: root password: 123456 canalAdapters: - instance: example # canal instance Name or mq topic name groups: - groupId: g1 outerAdapters: - name: logger - name: es hosts: 127.0.0.1:9300 properties: cluster.name: elasticsearch -
es 下 book.yml 是 ES mapping 的配置,告诉 client ES 要用到的 index、type 等:
dataSourceKey: defaultDS
destination: example
esMapping:
  _index: book
  _type: idx
  # _id: _id
  pk: id
  sql: "select id, title, desc, path, create_time, update_time from book"
#  objFields:
#    _labels: array:;
  etlCondition: "where update_time>='{0}'"
  commitBatch: 3000
启动 client 使用上面编译的 client-adapter,在 bin 目录下执行:
sh ./startup.sh
效果
client-adapter 会订阅到 instance(本例是 example):

往 book 表增删改数据:
